Overview
Since the launch of our v2 SIP Trunking infrastructure in 2024, many of our partners have already successfully migrated to take advantage of its modernized architecture. While our legacy v1 platform remains operational, we are now encouraging all remaining customers to transition to v2 to ensure continued service excellence, superior call quality, and alignment with current industry security standards.
Action Required
🔥Update Firewall Rules
Before migrating, you must update your network security policies. Please ensure your firewall is configured to permit signaling on port 5060 from these v2-specific endpoints:
SBC Name | Domain |
|---|---|
Neptune | 38.86.50.6 |
Venus | 38.86.50.14 |
Saturn | 38.101.249.111 |
Jupiter | 38.101.249.112 |
Mars | 108.175.2.118 |
Pluto | 62.151.182.102 |
To ensure consistent audio quality and prevent one-way audio issues, please whitelist the following media gateways. These require open communication for RTP traffic on UDP ports 9000 – 20000:
Media Gateway Name | Domain | Ports |
|---|---|---|
Misti | misti.wiretaptelecom.com | 9000 - 20000 |
Triniti | triniti.wiretaptelecom.com | 9000 - 20000 |
Capri | capri.wiretaptelecom.com | 9000 - 20000 |
Kiki | kiki.wiretaptelecom.com | 9000 - 20000 |
Heidi | heidi.wiretaptelecom.com | 38.86.50.9 |
Destini | destini.wiretaptelecom.com | 38.101.249.4 |
👆 Flip The Switch
Make sure you’re logged in to the Wiretap Portal, then navigate to your current trunk by selecting Manage Trunks, then Trunks. Select the trunk you’ll be upgrading to v2.
Scroll to down to the Trunk Version section and flip the switch from version 1 to version 2:
Press Save and wait for the trunk to re-provision. This can take up to 2 minutes.
💾 Update Your SRV Record
You’ll need to update your host settings for your sip trunk. If you’re using 3CX, you will do this by:
Navigating to Voice & Chat
In the general settings, scroll down to Server Details and enter the following into the Registrar/Server field:
“srv.globalsbc.core-trunk.com”
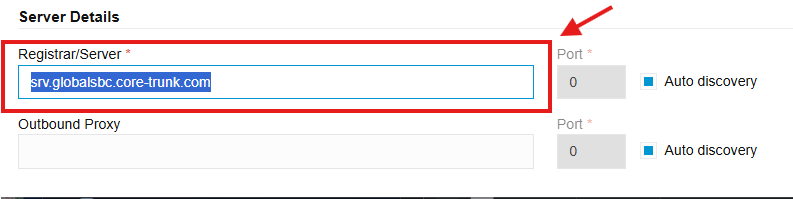
Press Save and you’re good to go!
Special Note for Legacy 3CX Installations
In some older 3CX installations or specific legacy configurations, you may find that the Registrar/Server and Outbound Proxy fields are locked or hidden, preventing you from entering the new SRV record.
If these fields are not editable in your current setup, you must re-build the trunk using the updated Wiretap v2 template:
Capture Current Settings: Before deleting your old trunk, take note of your current DID routing, Caller ID settings, and Emergency (E911) configurations.
Remove the Legacy Trunk: Delete the existing v1 trunk from your 3CX management console.
Add a New SIP Trunk: Navigate to Voice & Chat and select the v2 template you imported.
Configure & Save: This template will automatically unlock the necessary fields and populate the v2 endpoints.
Re-link DIDs: Re-assign your DIDs to their respective destinations (Extensions, IVRs, or Ring Groups).
Need help? If you are unsure which template to use or encounter registration issues after re-building, please contact our support team at (877) 471-3603 or open a ticket in the Support Portal.